
A bad AC installation in Southwest Florida doesn’t just mean a warm room. It means sky-high energy bills, a humid, clammy house, a system that short cycles every few minutes, and a unit that fails years before it should. Efficiency losses and discomfort commonly result from installation problems like oversizing, improper refrigerant charging, and leaky ducts. This guide walks you through every stage of the process, from the first measurement to the final inspection, so you can make confident decisions and hold any contractor to a professional standard.
Table of Contents
- What you need before starting the installation
- Step-by-step air conditioner installation process
- Common mistakes and troubleshooting tips
- Quality assurance and commissioning: Making sure it works
- Why ‘DIY install’ shortcuts leave Florida homeowners at risk
- Get expert air conditioner installation in Southwest Florida
- Frequently asked questions
Key Takeaways
| Point | Details |
|---|---|
| Professional sizing matters | Manual J calculations ensure your AC matches your space for comfort and efficiency. |
| Ductwork is critical | Sealed, tested, and well-designed ducts prevent energy loss and maximize system performance. |
| Commissioning can’t be skipped | Verifying performance and documentation protects your investment long-term. |
| Code compliance required | Florida law demands permitted work, verified duct sealing, and licensed installation. |
| Documentation protects you | Always get evidence of calculations, testing, and commissioning from your installer. |
What you need before starting the installation
To get started, you need more than just an AC unit. You need the right information, the right tools, and a clear plan before a single bolt is turned.
The single most important step before any installation is sizing the system correctly. A Manual J load calculation determines how much heating and cooling your property actually needs based on factors like square footage, ceiling height, insulation levels, window area, local climate, and even the number of people living in the space. Skipping this step and guessing based on “tons per square foot” is a shortcut that leads to real problems. An oversized system is one of the most common installation errors in Florida, and our AC oversizing guide explains exactly why bigger is not always better.
Manual J works alongside two companion calculations. Manual S uses the load data to select the specific equipment model that matches your home’s needs. Manual D guides the design of the duct system, including duct sizing, layout, and airflow distribution. Together, these three calculations form the technical backbone of any quality installation. Without them, you are relying on guesswork.
Here is a quick look at what each document covers:
| Calculation | What it determines | Why it matters |
|---|---|---|
| Manual J | Heating and cooling load for the building | Prevents oversizing and undersizing |
| Manual S | Equipment model selection | Matches system capacity to actual load |
| Manual D | Duct system design and sizing | Ensures proper airflow to every room |
Before your installer arrives, gather the following:
- Building plans or floor measurements (square footage, room dimensions)
- Window sizes, orientations, and glazing type (double pane vs. single pane)
- Insulation R-values for walls, attic, and floor if available
- Electrical panel capacity to confirm you can support the new system
- Existing duct condition reports, if ductwork is being reused
- Local permit requirements from your county or municipality
Pro Tip: Ask your contractor for a printed copy of the Manual J report before any equipment is ordered. If they cannot provide one, that is a serious red flag. A reputable installer does not skip this step.
Step-by-step air conditioner installation process
Once preparation is complete, you are ready to follow a proven process for a quality, efficient installation. This is where planning turns into action.
Step 1: Pull the required permits. In Florida, AC installation is a licensed trade. All permitted work must meet local building codes, and your contractor should handle the permit application before work begins. Skipping permits means no inspection, no code compliance, and potential problems when you sell your home.
Step 2: Confirm the load calculation and equipment selection. Before removing the old system, the installer should review the Manual J results and confirm the selected equipment matches both Manual S requirements and your budget. The Combined Manuals workflow from ACCA (Air Conditioning Contractors of America) links Manual J, S, and D into a single, connected process used by top-tier installers.
Step 3: Remove the old equipment safely. This includes recovering refrigerant legally (required by EPA regulations), disconnecting electrical, and removing the old air handler, outdoor condenser, and any equipment that will not be reused.
Step 4: Inspect and prepare the duct system. Even if you are keeping existing ductwork, it needs to be inspected for leaks, damage, and proper sizing. Florida code requires duct sealing and leakage testing as part of permitted HVAC work. Leaky ducts can waste 20 to 30 percent of conditioned air before it ever reaches a room.
Step 5: Install the air handler. The indoor unit should be mounted level and in an accessible location. Drain lines must be properly pitched and include a secondary drain pan and condensate switch to prevent water damage. This is especially critical in Florida, where humidity means condensate production is constant.
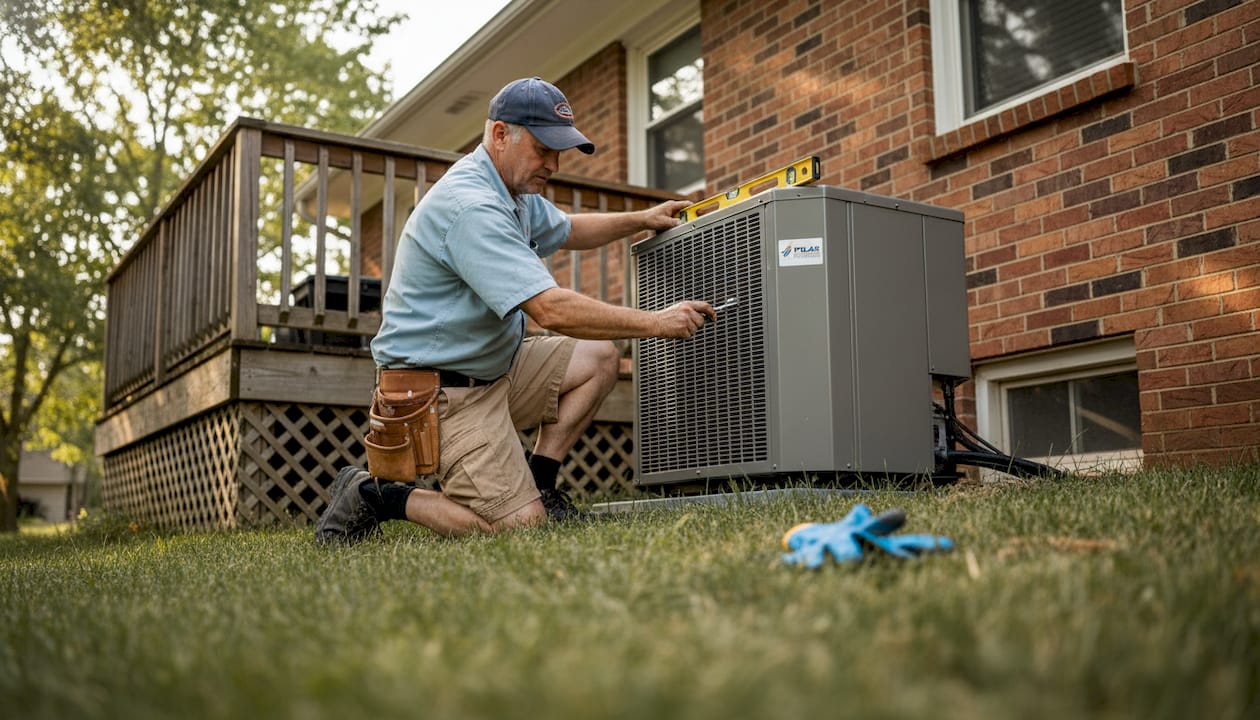
Step 6: Install the outdoor condenser. The unit should be placed on a stable, level concrete pad with adequate clearance on all sides for airflow. Keep it away from dryer vents, landscaping that could restrict airflow, and direct rain runoff. Use vibration isolation pads to reduce noise and vibration transfer.
Step 7: Connect refrigerant lines and charge the system. Refrigerant lines must be the correct diameter, properly insulated, and leak tested before charging. The system should be charged to manufacturer specifications using actual measurements, not guesswork. Our Florida AC efficiency guide covers how proper charging affects SEER2 ratings and comfort.
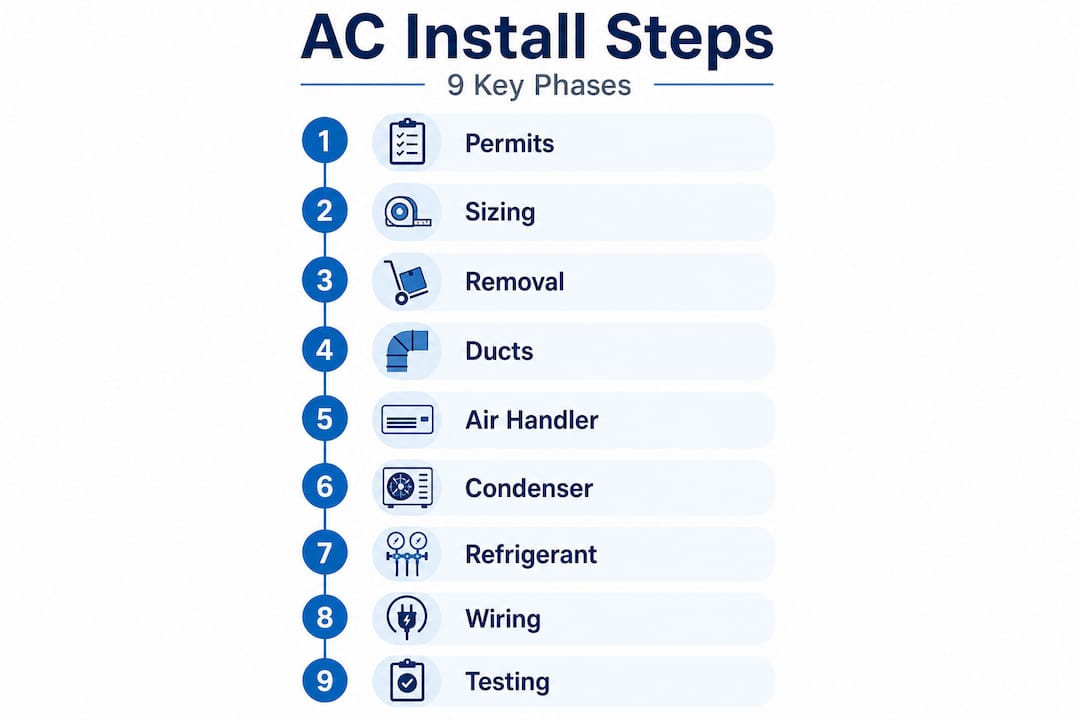
Step 8: Make electrical connections. All wiring must meet NEC (National Electrical Code) and Florida Building Code standards. This includes proper breaker sizing, disconnect switches, and low-voltage thermostat wiring.
Step 9: Commission and test the system. More on this in a dedicated section below, but this step confirms the whole system performs as designed.
Here is a simplified timeline for a typical residential installation:
| Phase | Typical time frame | Key milestone |
|---|---|---|
| Permit and planning | 2 to 5 business days | Permit issued, equipment ordered |
| Equipment removal | Half day | Old system safely removed |
| Installation | 1 to 2 days | New system fully installed |
| Commissioning | 2 to 4 hours | Performance verified and documented |
| Inspection | 1 to 3 business days | Code compliance confirmed |
For business owners, the process has additional complexity. Our commercial AC step-by-step guide outlines what is different for commercial systems. If you want to go deeper on the residential side, our local AC installation guide covers Southwest Florida specifics.
Pro Tip: Insist that refrigerant is weighed in during charging, not just estimated. Weighed charging is more accurate and is the only way to confirm the system is operating at peak efficiency from day one.
Common mistakes and troubleshooting tips
Even with careful planning and execution, it is easy to fall into common traps. Here is how to avoid the ones that cause the most damage.
Mistake 1: Oversizing the equipment. This is the most common error in Florida installs. An oversized unit cools the air quickly but shuts off before it can remove enough humidity. The result is a cold, clammy house. The system also short cycles, meaning it turns on and off more frequently, which increases wear and tear and shortens equipment life.
Mistake 2: Skipping duct work evaluation. Many contractors offer a “swap-out” installation where they replace the equipment but leave old ducts untouched. The problem is that efficiency losses from leaky ducts can completely cancel out the performance gains from a new, high-efficiency system. A new $6,000 system running through ducts that leak 25 percent of airflow will still underperform. Prioritize duct sealing and airflow verification as a non-negotiable part of the installation.
Mistake 3: Improper refrigerant charging. Too much or too little refrigerant forces the compressor to work harder, reduces efficiency, and shortens system life. This is a field error, not a product defect.
Mistake 4: Poor drain line installation. In Florida’s humid climate, condensate drain lines can clog with mold and algae within months. A properly installed drain line includes a trap, a secondary overflow, and a float switch that shuts the system down before water damage occurs.
“Efficiency and comfort losses from installation problems including oversizing, improper charging, and leaky ducts are common and preventable. Duct leakage and restrictive duct systems can negate the benefit of higher-efficiency equipment.” — U.S. Department of Energy
Use these checks to identify problems after installation:
- Uneven temperatures room to room often point to airflow or duct imbalances
- Humidity above 55 percent indoors is a sign of oversizing or short cycling
- System running almost constantly may indicate undersizing or a refrigerant issue
- Water near the air handler suggests a drain line or secondary pan problem
- Higher-than-expected energy bills often trace back to duct leaks
For more guidance on getting the most from your system after install, review our AC efficiency tips. And if the new unit already feels like it is struggling, our article on signs you need a new AC can help you figure out if the issue is installation or the equipment itself.
Pro Tip: After installation, run the system for at least one full hour and check that supply air temperatures are 15 to 20 degrees cooler than return air temperatures. That is a quick, practical indicator that the system is working correctly.
Quality assurance and commissioning: Making sure it works
With installation done, it is time to verify performance and protect your investment for the long run. Commissioning is the process of testing and documenting that your system delivers its designed comfort and efficiency, and it is not optional.
Field commissioning is what bridges the gap between what a system is rated to do in a lab and what it actually does in your home. A new 18 SEER2 system that is improperly installed may only perform at 13 or 14 SEER2 in practice. Commissioning closes that gap.
Florida code requires several specific checks as part of the inspection process. These include:
- Duct leakage testing to confirm ducts meet Florida Building Code standards
- Refrigerant charge verification using measured superheat and subcooling values
- Airflow testing at each supply and return register
- Thermostat and controls verification
- Electrical safety checks including amperage draw and disconnect ratings
- Insulation inspection on refrigerant lines and duct system
- Drain system test to confirm condensate flows correctly
Beyond code, the DOE recommends that homeowners require contractors to follow HVAC Quality Installation Specification guidance. Accepting just an equipment sticker or a handshake is not enough. A quality contractor will provide you with a commissioning checklist, signed and dated, along with permit inspection records.
Statistic to know: Studies show that up to 50 percent of installed HVAC systems in the U.S. have performance issues tied directly to poor installation rather than equipment failure. That number can be even higher in hot, humid climates like Southwest Florida where systems run harder and longer.
After commissioning, your contractor should walk you through basic system operation, filter replacement schedules, and thermostat settings for maximum efficiency. Our HVAC code requirements guide covers what Florida law mandates at each stage. And once your system is running well, our AC maintenance checklist will keep it performing at its best between professional tune-ups.
Why ‘DIY install’ shortcuts leave Florida homeowners at risk
Here is our honest take after working with homeowners across Naples, Cape Coral, and Fort Myers: the biggest risk in AC installation is not buying the wrong brand. It is accepting a low-effort process from a contractor who treats every install like a routine swap-out.
We see it regularly. A homeowner gets three quotes. Two contractors show up, look at the old system, and offer a price based on matching the existing tonnage. They do not discuss Manual J. They do not evaluate the duct system. They do not mention commissioning. The homeowner goes with the lowest price, the system goes in, and six months later they are calling us because the house never feels right.
Improper sizing and oversizing cause poor comfort outcomes that are frustrating and expensive to fix after the fact. Short cycling wears out a compressor years early. Persistent humidity leads to mold risk. And if the duct system was never evaluated, the homeowner may not even realize where the problem originates until a much larger repair bill arrives.
The right move is to ask for documentation before any work starts. Ask for the Manual J report. Ask what duct testing procedure they use. Ask who will sign off on the commissioning checklist. If a contractor gets defensive or dismissive about these questions, that is your answer.
Upgrading your system is a significant investment. You deserve to know it was done correctly. The signs of AC oversizing are often subtle at first, but they compound over time into real comfort and cost problems. Protect yourself by insisting on the process, not just the product.
Get expert air conditioner installation in Southwest Florida
Installing a new AC system correctly in Southwest Florida requires more than equipment. It takes licensed professionals who follow load calculations, test duct systems, and deliver documented commissioning results.

At Ultra Air Heating & Cooling, we serve homeowners and business owners across Naples, Cape Coral, and Fort Myers with installations built on Manual J, Manual S, and Manual D. Every project includes proper permitting, duct evaluation, and a commissioning walkthrough so you know the system performs as promised. If you are starting from scratch or updating an older system, our Fort Myers installation guide walks through what to expect locally. Want to understand what commissioning involves? Our commissioning overview explains the full process. Or explore our HVAC retrofit options if your existing structure needs a custom approach. Reach out today to schedule your consultation.
Frequently asked questions
Why is Manual J calculation crucial for AC installation?
Manual J ensures your AC is sized for your property’s actual cooling needs rather than a rough estimate, which directly improves comfort and lowers energy costs. Sizing using a Manual J calculation is the correct starting point for any quality installation.
Is ductwork replacement always required during a new AC installation?
Not always, but ducts must be inspected, sealed, and tested to meet Florida code even when they are being reused. Florida code requires duct sealing and leakage testing as part of any permitted HVAC installation scope.
What is HVAC system commissioning?
Commissioning is a structured set of tests and measurements confirming your new AC system delivers the comfort and efficiency it was designed for. Field commissioning is especially important in Florida where humidity and heat put systems under constant pressure.
How do I know if my installer uses best practices?
Ask for the Manual J report, code inspection records, and a signed commissioning checklist before any work begins. DOE guidance explicitly recommends requiring contractors to follow HVAC Quality Installation Specification standards on every project.
Can I save money by skipping load calculation or inspections?
Skipping these steps typically costs far more over time through poor system performance, higher monthly bills, and premature equipment failure. Efficiency losses and discomfort from shortcuts like oversizing, improper charging, and unchecked duct leaks are preventable with the right process.
Recommended
- Air Conditioner Installation Near Me: The 2026 SWFL Homeowner’s Guide – Ultra Air Heating and Cooling
- Commercial AC Setup: Step-by-Step Guide for SWFL Owners
- Expert Air Conditioning Installation in Bonita Springs: Beat the SWFL Heat – Ultra Air Heating and Cooling
- Upgrade Your HVAC System: Step-by-Step Guide for Better Efficiency